Chapter 4.
How to Accept Donations Online & Build an Email List Now
The Beginner’s Guide to Online Donations
Get Online Donations with Your Website, Newsletter & Social Media
Nonprofits: Learn how to build an email list with subscription and volunteer forms, and accept donations online with online payment services. Make your nonprofit website look uniquely yours with got-to-have HTML snippets.
Last week we introduced Chapter 3. How to Create a Website: Your Brand, Webpage Design & Compelling Content.
Today we are presenting the full version of Chapter 4 so you can get started adding content to your new site.
Chapter 4.
How to Accept Donations Online & Build an Email List Now.
How to Accept Donations Online & Build an Email List Now.
Here is a quick summary of the 4 steps in the chapter:
Tab 1. Setting up sign-up forms, exploring donation options and a pre-publish checklist: Overview of Chapter 4.
Tab 2. Guide 10. 4 must-have copy/paste webpage HTML snippets for tables, bullets and indented paragraphs.
Tab 3. Guide 11. Quick start volunteer, and subscription forms. Exploring online donation options.
Tab 4. Guide 12. Pre-Publish Checklist: Final page edit. Checking spelling, grammar and links.
Chapter 4 is set-up for you in the 4 tabs just below.
How to accept donations online, Setting up sign-up forms, exploring donation options and a pre-publish checklist: Time Requirement.
- Introduction: 10 minutes.
- HTML Snippets: 10 minutes.
- Donor Forms: 30 minutes – 1 hour.
- Checklist: 10 minutes.
Total Time for Chapter 4. 1 – 1.5 Hours. In this chapter you will learn a few new formatting tools, and explore mailing list sites and online payments systems to accept donations online. You will also be able to see a preliminary website pre-publication checklist.
Chapter 4 is set-up for you in the 4 tabs below.
Links for How to Create a Website: Your Brand, Page Design & Content:
Overview | 10. 4 Snippets | 11. Donor Forms | 12. Checklist |
CHAPTER 4 OVERVIEW. How to Accept Donations Online & Build an Email List Now.
This week in Chapter 4 we’re going to learn a few new formatting tools, and explore mailing list sites and online payments systems to accept donations online. You will also be able to see a preliminary website pre-publication checklist.
Learn More details on how to design a website.
Guide 10: 4 Snippets. 4 must-have copy/paste webpage HTML snippets for tables, bullets and indented paragraphs.
In the first section of Chapter 4, 4 must-have copy/paste webpage HTML snippets for tables, bullets and indented paragraphs, we will show you how to access HTML snippets that you can use to build beautiful pages on your website. We will give you a step-by-step description of how they work and how to use them.
This may be a little advanced, but in the last chapter we successfully looked at copying HTML paragraphs and pasting them into a new webpage to duplicate an effect. This isn’t any more complicated.
Guide 11. Quick start volunteer, and subscription forms. Exploring online donation options to accept donations online.
The second section will lead you in exploration of different programs and services that are available for developing forms. These forms can be used to allow visitors to subscribe to your newsletter and volunteers to connect with you.
These forms range from super simple to a little bit more complex and powerful. Your choice!
We will also look at different online payment services so that you can begin to accept donations on your site. We’ll show you several different services that you can explore and make a decision which would be the best for your organization to use.
We want you to explore both the forms and the payment services now so that you will have a month or so to explore them, discuss them with the appropriate people in your organization, and then make a decision which ones to sign up for. This is because in Chapter 9 we will actually start using them so we want to make sure that you’re well-prepared.
Guide 12. Pre-Publish Checklist: Final page edit. Checking spelling, grammar and links.
We’re going to introduce a preliminary a pre-publish checklist. This is going to be a simple one, and as we move through the different chapters I will add a few things to the checklist. So for example, in the landing page chapter, I might add a few more boxes to check to the checklist, and the same with the email newsletter chapter.
Get Going!
So now, click on the second tab to learn about great new HTML snippets for customizing your site. Click on the third tab to learn all about newsletter and volunteer subscriber forms—and online payment services to accept donations online. And click on the fourth tab to see a great preliminary pre-publication checklist for your new webpages.
Next week, in the next chapter (Chapter 5), we’re going to learn a little bit more about the importance of landing pages, keywords, and how they all relate to SEO.
Enjoy. See you next week.
Back to Links for How to Create a Website: Your Brand, Page Design & Content.
CHAPTER 4. How to Accept Donations Online & Build an Email List Now.
Guide 10 Snippets. 4 must-have copy/paste webpage HTML snippets for tables, bullets and indented paragraphs.
This may be a little advanced, but in the last chapter we successfully looked at copying HTML paragraphs and pasting them into a new webpage to duplicate an effect. This isn’t any more complicated.
Bulleted Lists.
Here are several kinds of bulleted lists.
Square Bullets. You can Google different shapes of bullets and just substitute their name for the term ‘square.’ This is called an ‘unordered list’ hence the ‘ul’ below.
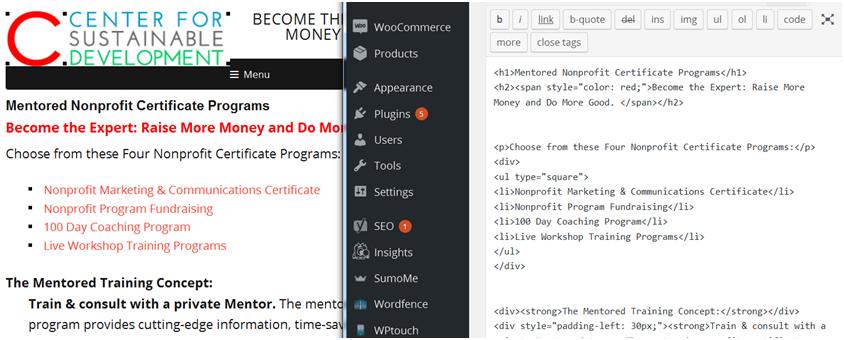
Here is the HTML code in case you want to copy it and use it:
<div>Choose from these Four Nonprofit Certificate Programs:</div>
<div>
<ul type=”square”>
<li>Nonprofit Marketing & Communications Certificate</li>
<li>Nonprofit Program Fundraising</li>
<div>Choose from these Four Nonprofit Certificate Programs:</div>
<div>
<ul type=”square”>
<li>Nonprofit Marketing & Communications Certificate</li>
<li>Nonprofit Program Fundraising</li>
<li>100 Day Coaching Program</li>
<li>Live Workshop Training Programs</li>
</ul>
</div>
<li>Live Workshop Training Programs</li>
</ul>
</div>
Tight Bullets. You’ll notice that the bullets above have a space between the heading and the bullets. These tight bullets alleviate that. It’s great for tight spaces—such as a sidebar or a list of newsletters.
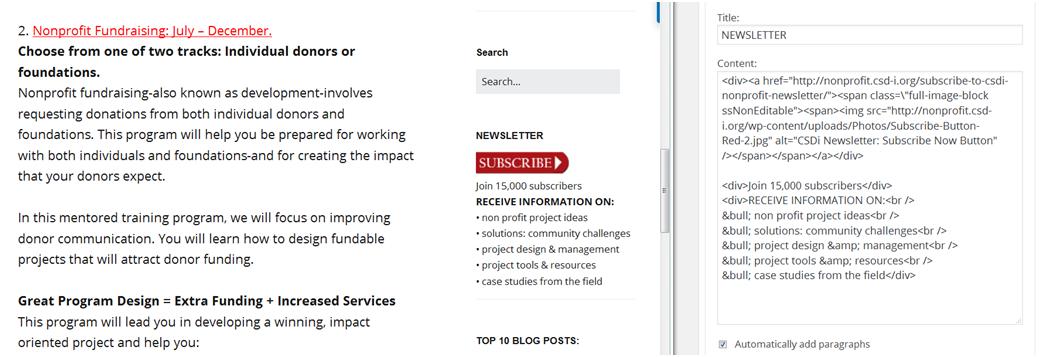
Here is the HTML code in case you want to copy it and use it:
<div>Join 15,000 subscribers</div>
<div>RECEIVE INFORMATION ON:<br />• non profit project ideas<br />• solutions: community challenges<br />• project design & management<br />• project tools & resources<br />• case studies from the field</div>
<div>Join 15,000 subscribers</div>
<div>RECEIVE INFORMATION ON:<br />• non profit project ideas<br />• solutions: community challenges<br />• project design & management<br />• project tools & resources<br />• case studies from the field</div>
Tech Tools: Just for your interest, this type of bulleted list is in my sidebar where I don’t have a lot of room. In the Illustration on the right, you can see the HTML code. This code is inside of ‘Dashboard’ ‘Appearance’ Widgets.’ I then clicked on ‘Right Sidebar’ and on a text widget that I made called ‘Text: NEWSLETTER.’
I can copy this HTML snippet from a main page of the website and paste it into this sidebar widget, or I can copy it from this sidebar widget and paste it into the main page of the website. Code is code in is somewhat universal within the different elements of your site.
Ordered Lists.
An ordered list is exactly like an unordered list except you use an ‘ol’ rather than a ‘ul.’ This gives you a number list (ordered).
An ordered list is exactly like an unordered list except you use an ‘ol’ rather than a ‘ul.’ This gives you a number list (ordered).

Here is the HTML code in case you want to copy it and use it:
<div>This program will lead you in developing a winning, impact oriented project and help you:</div>
<div><ol>
<li><span>Determine who your potential new donors are.</span></li>
<li><span>Clearly articulate need and outline activities for solving the challenges.</span></li>
<li><span>Show individual donors the ‘why’ behind your request for a donation.</span></li>
<li>Develop documentation to support your project such as budgets and fact sheets.</li>
<li>Carefully compare project design to donor interest.</li>
<li>Capture donor imagination with improved communications.</li>
<li><span>Enjoy increased funding for your program services.</span>/li>
</ol></div>
A Simple Table: Photo on the left and text on the right.
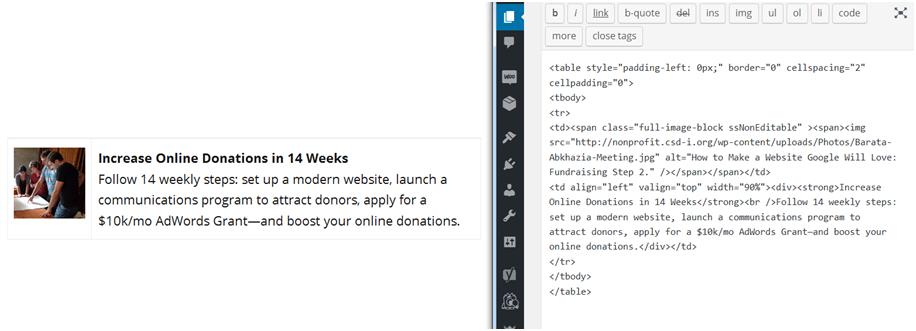
Here is the HTML code in case you want to copy it and use it:
<table style=”padding-left: 0px;” border=”0″ cellspacing=”2″ cellpadding=”0″>
<tbody>
<tr>
<td><span class=”full-image-block ssNonEditable” ><span><img src=”https://nonprofit.csd-i.org/wp-content/uploads/Photos/Barata-Abkhazia-Meeting.jpg” alt=”How to Make a Website Google Will Love: Fundraising Step 2.” /></span></span></td>
<td align=”left” valign=”top” width=”90%”><div><strong>Increase Online Donations in 10 Weeks</strong><br />Follow 10 weekly steps: set up a modern website and launch a communications program to attract donors.</div></td>
</tr>
</tbody>
</table>
Indented Paragraphs. Sometimes a paragraph—or a quotation—gets special attention when it is indented.

Here is the HTML code in case you want to copy it and use it:
<div style=”margin-left: 20px;”>CSDi is releasing a new nonprofit book on online fundraising in September. We’re offering newsletter subscribers a full preview in 14, weekly, action-oriented chapters. See what the 14 weekly installments include. Take advantage of this opportunity: Subscribe now!</div>
<div style=”margin-left: 20px;”>CSDi is releasing a new nonprofit book on online fundraising in September. We’re offering newsletter subscribers a full preview in 14, weekly, action-oriented chapters. See what the 14 weekly installments include. Take advantage of this opportunity: Subscribe now!</div>
So now we had a quick tour of how HTML snippets can be used to customize your website. It’s time now to begin focusing on how to collect subscriber and volunteer names–and how to collect money!
So click on the next tab, Tab 3, called ‘Donor Forms.’
Click here to subscribe to our newsletter and receive new chapters on a weekly basis.
Back to Links for How to Create a Website: Your Brand, Page Design & Content.
CHAPTER 4 Donor Forms. How to Accept Donations Online & Build an Email List Now.
Guide 11 Donor Forms. Get collecting right away: Quick start volunteer, and subscription forms. Exploring online donation options to accept donations online.
It is said that “Email is King: Get Started Building Your List.” And it is true. A truly interested subscriber to your newsletter is going to represent much more ongoing, loyal support—than a casual visitor who found you through a general search on the Internet. You can send subscribers regular newsletters on compelling topics that will inspire them to donate, volunteer, tell their friends and give you extremely valuable feedback.
Email list building is an important thing that you need to begin doing now.
In Chapter 9, we will focus in depth on ways to capture new, loyal subscribers.
INTRODUCTION TO LIST BUILDING
The reason for introducing the topic now, is that you might need to make some decisions. If you don’t have a current system for collecting emails, today’s introduction will give you approximately a month to explore possibilities and sign up for a service in preparation for Chapter 9.
Step One.
- Do you currently have an email newsletter service provider?
- Do they provide you with a way for people to sign up for your newsletter?
- Can you incorporate their signup feature on your website?
- If not, Do you have an alternate way to collect subscription, volunteer and contact information on your website?
If the answer is no to one or several of these questions read on!
This is the simplest thing to do to begin collecting names:
1. Install the WordPress WPForms plugin. It is a super simple way to develop a form for your WordPress website that will collect names, email addresses, and other useful information. You can even connect it to your email service.
https://wordpress.org/plugins/wpforms-lite/
1. Install the WordPress WPForms plugin. It is a super simple way to develop a form for your WordPress website that will collect names, email addresses, and other useful information. You can even connect it to your email service.
https://wordpress.org/plugins/wpforms-lite/
A little more complex:
2. Set up a Google Drive account. Google Drive has a feature very similar to an Excel spreadsheet—but that also allows you to create a form that you can paste into your website. Visitors can subscribe using one of these forms, and Google Drive will send you an email letting you know that you have a new subscriber.
https://support.google.com/drive/answer/2424384?hl=en
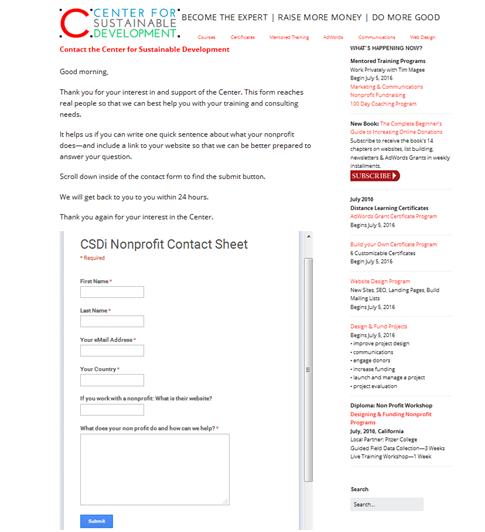
We use Google Drive to create forms and you can see an example here:
https://nonprofit.csd-i.org/contact-us-with-nonprofit-questions/
https://nonprofit.csd-i.org/contact-us-with-nonprofit-questions/
A tad more complex:
3. Mailchimp. MailChimp is a very popular email newsletter service provider that is easy to use and quite flexible. Here’s what they say:
3. Mailchimp. MailChimp is a very popular email newsletter service provider that is easy to use and quite flexible. Here’s what they say:
Forever Free Pricing
You can send 12,000 emails a month to a list of up to 2,000 subscribers with MailChimp’s Forever Free plan, though a few features are only available to paying users.
You can send 12,000 emails a month to a list of up to 2,000 subscribers with MailChimp’s Forever Free plan, though a few features are only available to paying users.
Learn more and sign up:
https://mailchimp.com/pricing/free/
https://mailchimp.com/pricing/free/
If you don’t already have a newsletter service provider, this may be your best of the three options.
The benefit is that with MailChimp you get integration between a subscription form, your website, and an email list—and you can actually begin sending emails too. One stop shopping!
MaleChimp has several simple ways of creating email subscription forms. Each subscription form is linked to a subscriber list. So for example, you can create a general newsletter subscription form, a donor newsletter subscription form, and a volunteer newsletter subscription form.
This means that you might have a special volunteer event on an upcoming weekend—and you can send the announcement exclusively to volunteer subscribers. Or perhaps, you have a fund-raising golf tournament coming—you can send that announcement exclusively to donor subscribers.
They also have several ways for visitors to access the subscription forms—from the super simple to a form embedded in your subscription webpage. Here’s an example of an embedded, MailChimp subscription form:
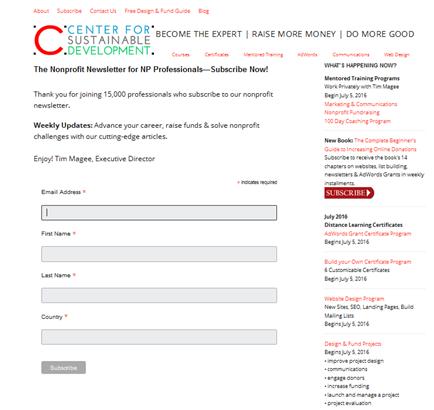
Because MailChimp has been around for so long, it works seamlessly with the number of other service providers—such as WordPress. MailChimp has a simple WordPress plugin which helps to insert a subscription form into your website.
In Summary, I would suggest creating a MailChimp account and keeping your subscription forms and email newsletter generation under one roof.
Please Note: We will be covering setting up MailChimp subscription
forms in great detail in Chapter 9.2.
forms in great detail in Chapter 9.2.
ACCEPT DONATIONS ONLINE:
Just in case you don’t have an online system to accept donations let’s look at a couple of options that you can explore. You might need to confer with your Executive Director or bookkeeper.
The way that these online services work is that you set up an account with them links to your organization’s bank account. In a similar fashion to setting up a subscription form, you set up a payment (donation) form. Also, similar to subscription forms, these payment forms can range from the super simple to more sophisticated embedded form.
These online payment systems charge a processing fee of roughly 3.5%.
PayPal
PayPal has a program for nonprofits where they will process your payments for 2.2%. They say:
PayPal has a program for nonprofits where they will process your payments for 2.2%. They say:
PayPal offers discounted transaction rates for 501(c)(3) for most products, and consistently low rates for all other nonprofits. No extra fees for setup, statements, withdrawals or cancellation.
2.2% + $0.30 per transaction and no monthly fee.
https://www.paypal.com/webapps/mpp/donations
2.2% + $0.30 per transaction and no monthly fee.
https://www.paypal.com/webapps/mpp/donations
CSDi uses PayPal. We’ve been using them for a number of years and are all set up with a number of payment form templates that we can modify quickly for different purposes.
They have a simple form to accept donations already set up which you can begin using right out-of-the-box.
Stripe
Stripe is an Irish technology company that allows both private individuals and businesses to accept payments over the Internet.
2.2% + $0.30 per transaction and no monthly fee.
https://stripe.com/us/pricing
Stripe is an Irish technology company that allows both private individuals and businesses to accept payments over the Internet.
2.2% + $0.30 per transaction and no monthly fee.
https://stripe.com/us/pricing
Stripe become popular with small e-commerce businesses and is frequently packaged with different web platforms. So, for example, SquareSpace uses Stripe for their e-commerce program.
Other nonprofit service providers with online payment systems.
Google Wallet & Google Grants
Google Wallet service fee: 2.9% + $0.30 per transaction.
http://googlefornonprofits.blogspot.com/2012/10/grow-your-gifts-increase-online.html?m=1
Google Wallet service fee: 2.9% + $0.30 per transaction.
http://googlefornonprofits.blogspot.com/2012/10/grow-your-gifts-increase-online.html?m=1
Mightycause Donation Widget
Mightycause service fee: 4.9% processing free per donation.
https://www.mightycause.com/guide/donation-widget?format=html
Mightycause service fee: 4.9% processing free per donation.
https://www.mightycause.com/guide/donation-widget?format=html
Network for Good DonateNow Lite
DonateNow Lite service fee: 5% processing free per donation.
http://www.networkforgood.org/npo/fundraising/donations/direction.aspx
DonateNow Lite service fee: 5% processing free per donation.
http://www.networkforgood.org/npo/fundraising/donations/direction.aspx
In Summary:
If you don’t already have an online payment system to accept donations online, you have about a month before we begin seriously looking at online donations in Chapter 9 to get signed up for one.
If you don’t already have an online payment system to accept donations online, you have about a month before we begin seriously looking at online donations in Chapter 9 to get signed up for one.
Research other possibilities on Google, ask your nonprofit friends, and then explore different service provider websites to find out more specifically what their programs are.
There is a small learning curve to signing up for these programs and launching your first donation form—but it’s not too tough—and they all have tremendous telephone support systems. So get going!
In the Next Section we will look at a pre-publication checklist for your new webpages. Click in the 4th Tab: Checklist.
Click here to subscribe to our newsletter and receive new chapters on a weekly basis.
Back to Links for How to Create a Website: Your Brand, Page Design & Content.
CHAPTER 4. How to Accept Donations Online & Build an Email List Now.
Guide 12 Pre-Publish Checklist. Final page edit. Checking spelling, grammar and links
Never enough time, and always in a hurry. There is that continuing temptation to push a new webpage’s ‘Publish’ button and be able to cross that project off of your list.
Wait! Don’t do it yet! Typically whether you post a new page today or tomorrow isn’t going to make that much of a difference.
A simple checklist can help with this dilemma.
So I’m going to include a pre-publish checklist just below. This is going to be a simple one, and as we move through the different chapters I will add a few things. So for example, in the landing page chapter, I might add a few more boxes to check to the checklist, and the same with the email newsletter chapter.
Why? Although today the idea is to make sure that your new page is indeed ready to publish—we will be focusing more on things like spell checks, double checking links, and making sure that we completed our Yoast Simple SEO activities.
But when we get to landing pages and newsletters—all of these need to integrate with each other. An example might be that last week on your first webpage you chose a ‘Focus Keyword’ in your Yoast SEO analysis: ‘ nonprofit newsletter.’
If this first page from Chapter 3 is destined to become a revised landing page in Chapter 5, we might need to add to the checklist that the focus keyword is double checked in the process of revising your landing page. In a similar fashion, before you post your newsletter in Chapter 10, we want to make sure that this focus keyword is integrated.
So we will add these checkboxes to your prepublication checklist over the next few weeks.
CHECKLIST
COPY
1. Read through copy and double check that it makes sense. Does the information flow in a logical fashion?
2. Does the final page content fulfill the goals that you had set out for your organization?
3. Have a colleague read through the copy and make sure that it makes sense. Does the information flow in a logical fashion?
4. Does your colleague feel that the final page content fulfill the goals that you had set out for your organization?
5. Are the photos relevant—and the images in focus?
6. Is the content relevant to your readers interests? Does it encourage them to take some kind of action (donate, volunteer, share or comment)?
5. Does the final page presentation maintain the look and feel of the main website?
6. Does the final page maintain the formatting that you developed for your preliminary landing pages in Chapter 3?
SEO
1. Have you checked to make sure that you don’t have any red stoplights in the Yoast SEO analysis?
- Your page title is the correct length (65 characters total including site title).
- There is a meta-description of the webpage that is156 characters or less.
- There is a well researched focus keyword for the page.
- The focus keyword appears in the header, the first paragraph, in the main body of the content and in the meta-description.
- The focus keyword appears in the page title and in the URL of the page.
- There are images on the page and they all have ‘alt’ descriptions.
SPELLING, GRAMMAR & LINKS
- A spelling and grammar check has been run on the page.
- All links have been checked—they work and they go to the page indicated.
You are done! Now, it’s time to get serious about landing pages. Next week, in Chapter 5, we’re going to learn a little bit more about the importance of landing pages, keywords, and how they all relate to SEO.
Super Summary
Back to Links for How to Create a Website: Your Brand, Page Design & Content.
In the next chapter (Chapter 5) we’re going to learn a little bit more about the importance of landing pages, keywords, and how they all relate to SEO.
Enjoy. See you next week.
Want to enjoy this chapter’s learning process with a live teacher? See the online, teacher-led course behind this chapter.
Copyright © Tim Magee